iPhone and iPad operation order

Shadowrocket First Connection Step-by-Step Guide

Follow the actual in-app entries to add a server, choose routing, connect, verify the result, and troubleshoot issues. This guide keeps interface terms such as Home, Config, Global Routing, Add Server, Subscribe, and Connectivity Test in English for easy screen-by-screen reference.

Steps

For a first setup, complete the steps in order. If servers have already been imported, start directly with Global Routing.

Add a server or import an existing subscription

After opening Shadowrocket, enter Home first. The SERVER section near the bottom lists saved server entries. If there are no selectable entries yet, open Add Server. Choose the method that matches the information you have: enter the details manually when you have one set of server parameters, or use Subscribe when you have a complete subscription link. Both methods save information you already have in the app, so there is no need to import the same information twice.

Enter one server manually

After opening Add Server, tap Type and choose the protocol that exactly matches the existing server details, such as Shadowsocks, VMess, VLESS, Trojan, WireGuard, or Hysteria2. Similar protocol names do not mean that parameters are interchangeable, so do not guess based on the port or the appearance of a link. After selecting Type, the page displays fields for that type. Host, Port, Password, and Method are common fields; other Types may show additional options.

Place each detail in its corresponding field. Enter the server domain or address in Host, the port number in Port, the authentication content in Password, and the exact original value in Method. When copying, check for spaces at the beginning or end, and do not paste explanatory text together with the parameter. If the details also include transport, TLS, SNI, a path, a key, or other fields, enter them as provided. When a field is missing, check the source of the details instead of substituting a similar value. Save using the page’s provided control, then return to Home and confirm that the new entry appears in the SERVER section.

Import through Subscribe

If you have a subscription link, open the subscription management entry in Shadowrocket, choose Subscribe, add a label that is easy for you to recognize, and paste the complete link into the corresponding URL field. Save it and run an update once, then wait for the app to parse the content. After the update, return to Home and check for the server entries provided by the subscription. A subscription only transfers configuration content. If no entries appear after an update, first check whether the link is complete and still valid, and whether an extra line break was added while copying.

Scan QR Code is suitable when the information is provided as a QR code. Use it only with information you have already obtained and whose purpose you understand. Import from Cloud JSON is another configuration import entry; use it only when your existing information specifically requires this format. Do not repeat every available import method just because they are shown together, or Home may contain duplicate entries that are difficult to distinguish later.

Once the server appears in Home, do not immediately change many Settings. The next step is only to handle Global Routing and decide whether this connection should use Config, Proxy, or Direct. This keeps server parameter issues separate from routing mode issues.
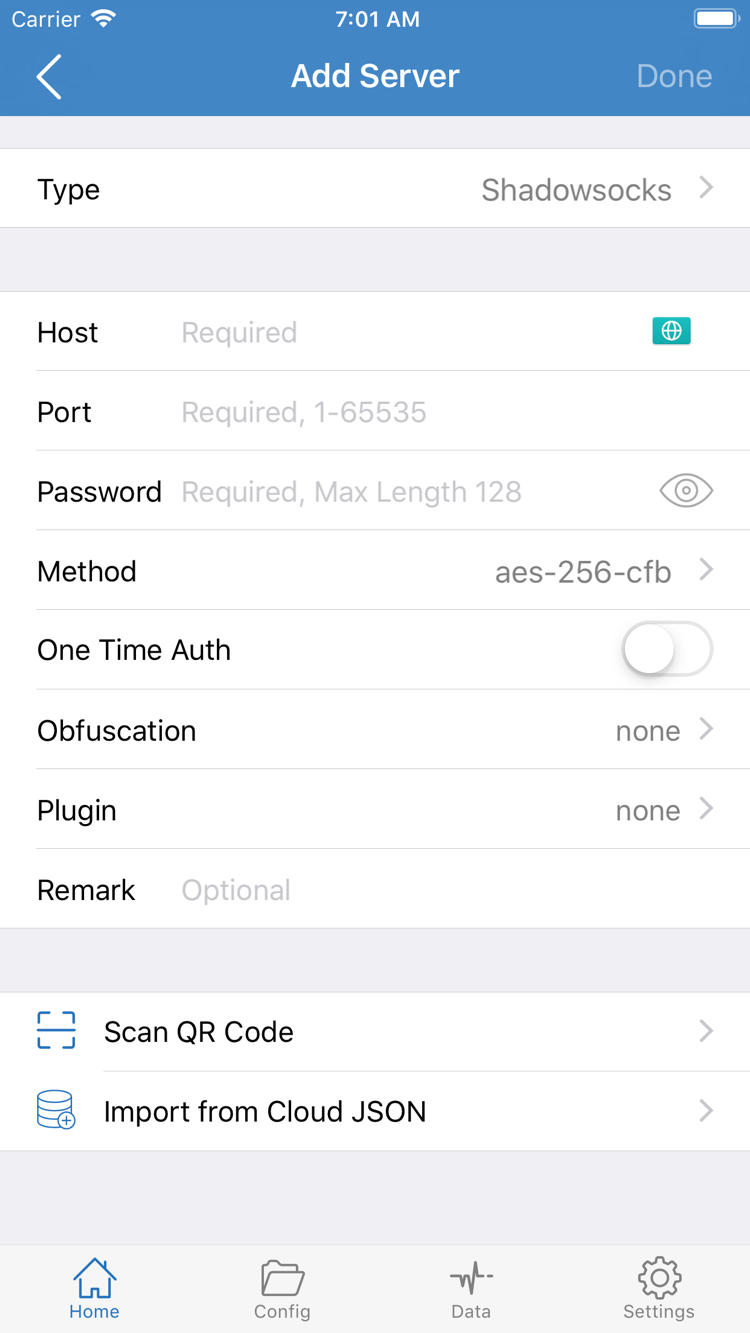
Shadowrocket Add Server screenshot showing Type, Host, Port, Password, Method, Scan QR Code, and Import from Cloud JSON
Add Server: choose Type according to the existing server details and check each field.

Choose a Global Routing mode

Return to Home and find Global Routing. This determines how traffic is handled after entering Shadowrocket. The three options are Config, Proxy, and Direct. They are operating modes, not three server protocols, and they do not replace the server parameters entered in the previous step.

Config

Config evaluates requests against the rules in the current configuration file. Rules usually send requests to PROXY, DIRECT, or another configured policy according to the domain, IP range, or other conditions. When different destinations need different handling, choose Config and confirm which configuration file is active. Rules are evaluated in order, and an earlier match is usually applied first. If one destination could match several rules, place the more specific condition in the appropriate position.

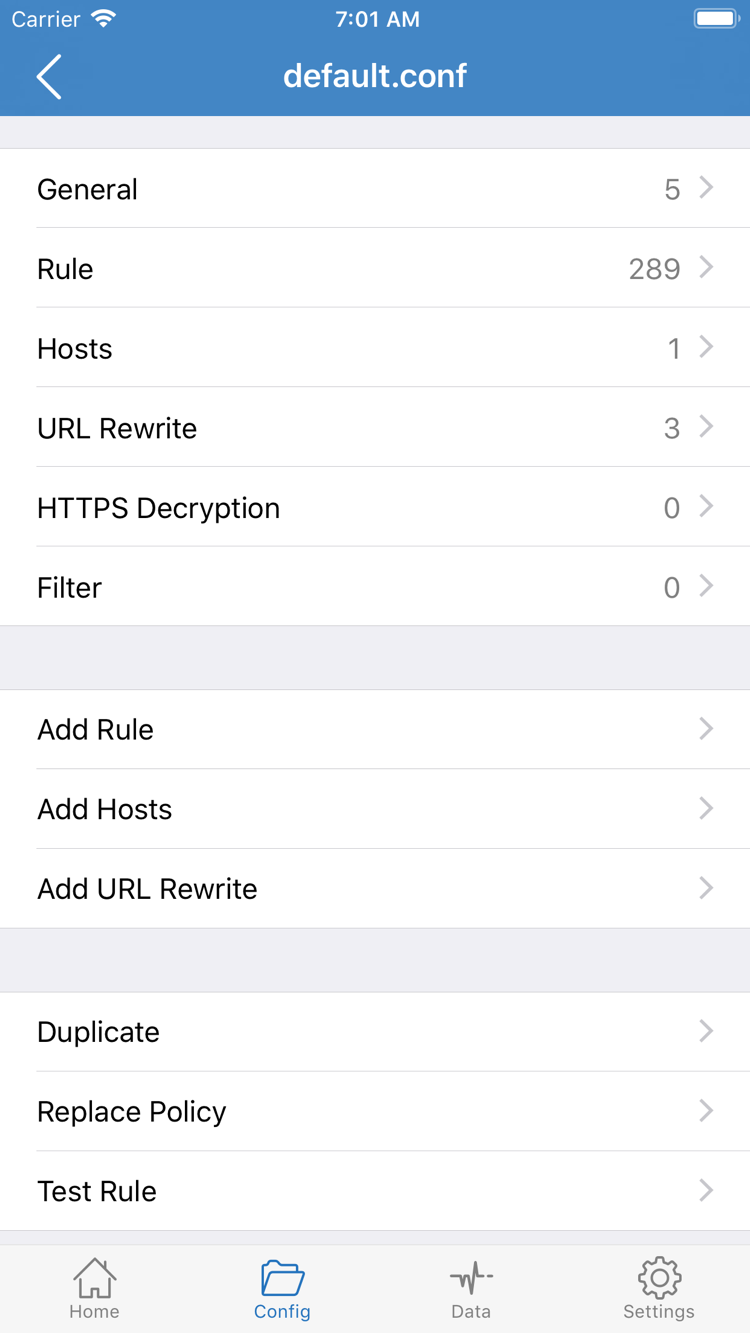
Inside Config, you may see sections such as General, Rule, Hosts, URL Rewrite, and HTTPS Decryption. There is no need to edit each one during the first connection. The immediate goal is to confirm that a configuration file exists and that Rule contains usable rules. Before using Add Rule, understand the matching condition and resulting policy. For example, DOMAIN-SUFFIX,example.com,PROXY matches a domain suffix and sends it to PROXY, while GEOIP,CN,DIRECT matches the corresponding IP data and sends it to DIRECT. Keep rule keywords and parameter order in their original English form.

Other common matching keywords include DOMAIN, DOMAIN-KEYWORD, IP-CIDR, IP-CIDR6, and USER-AGENT. They apply to different objects, so replacing only the keyword while keeping everything else unchanged is not appropriate. In particular, an IP-CIDR range, a complete DOMAIN, and the suffix semantics of DOMAIN-SUFFIX are different. During the tutorial, use an existing configuration that has been checked. For complex rule editing, see the Server Management Manual.

Proxy and Direct

Proxy handles the connection through the currently selected server. It is useful for temporarily bypassing rule decisions and checking whether the server itself works. It can help with troubleshooting, but it does not have to be used permanently. Direct connects directly without using the current server. With Direct selected, the result differs from Proxy even if the switch at the top of Home is on. If Direct was selected by mistake, repeatedly changing the server password usually will not resolve a mode-selection issue.

When following this guide for the first time, choose Config if you have a configuration file and want rule-based routing. Choose Proxy briefly if you only want to determine whether a selected server can connect. Return to the required mode after testing. Once Global Routing is selected, avoid switching repeatedly. Continue by selecting a SERVER entry and opening the connection so that each result has clear conditions.

Shadowrocket Config screenshot showing General, Rule, Hosts, URL Rewrite, HTTPS Decryption, and Add Rule
Config: Rule, Hosts, and other configuration sections are shown separately; check Rule first during initial setup.

Select a SERVER entry and connect

In the SERVER section of Home, find the entry you just added or received after a Subscribe update, and select it. A selection mark appears beside the selected entry. Do not skip this action: multiple entries in Home only mean that they are saved; the one selected here is the one used for the current connection. If a subscription was just updated, check the label to confirm the source before selecting the target server.

Check Global Routing on Home and confirm that it is still Config or Proxy as selected in the previous step. Then turn on the switch at the top of the page. Before connecting, the top shows Not Connected; after turning it on, allow the system a little time to establish the connection. The first time Shadowrocket is used on a device, the system displays an authorization prompt to add a VPN configuration. Confirm it using the device’s provided authentication method, return to Shadowrocket, and wait for the status to update. This system authorization creates the device-level connection entry and requires the user’s confirmation.

If the switch quickly returns to Not Connected, do not tap it repeatedly. First check whether the current SERVER still has a selection mark, then confirm that the parameters were saved. For a manually added entry, check Type, Host, and Port first. For an entry imported through Subscribe, run an update and confirm that the entry does not show an expiration or failure notice. Repeatedly toggling the switch can combine several failures and make it harder to determine whether authorization, parameters, or network status is responsible.

Operation differences on iPhone and iPad

The layout on iPhone and iPad may change with screen size, but the core entry names and relationships remain the same: Home selects SERVER entries and controls the top switch, Global Routing controls the mode, and Connectivity Test performs the next check. System requirements should always be confirmed on the App Store page. When setting up another device, recheck its SERVER selection, system authorization, and configuration file instead of inferring its state from another device.

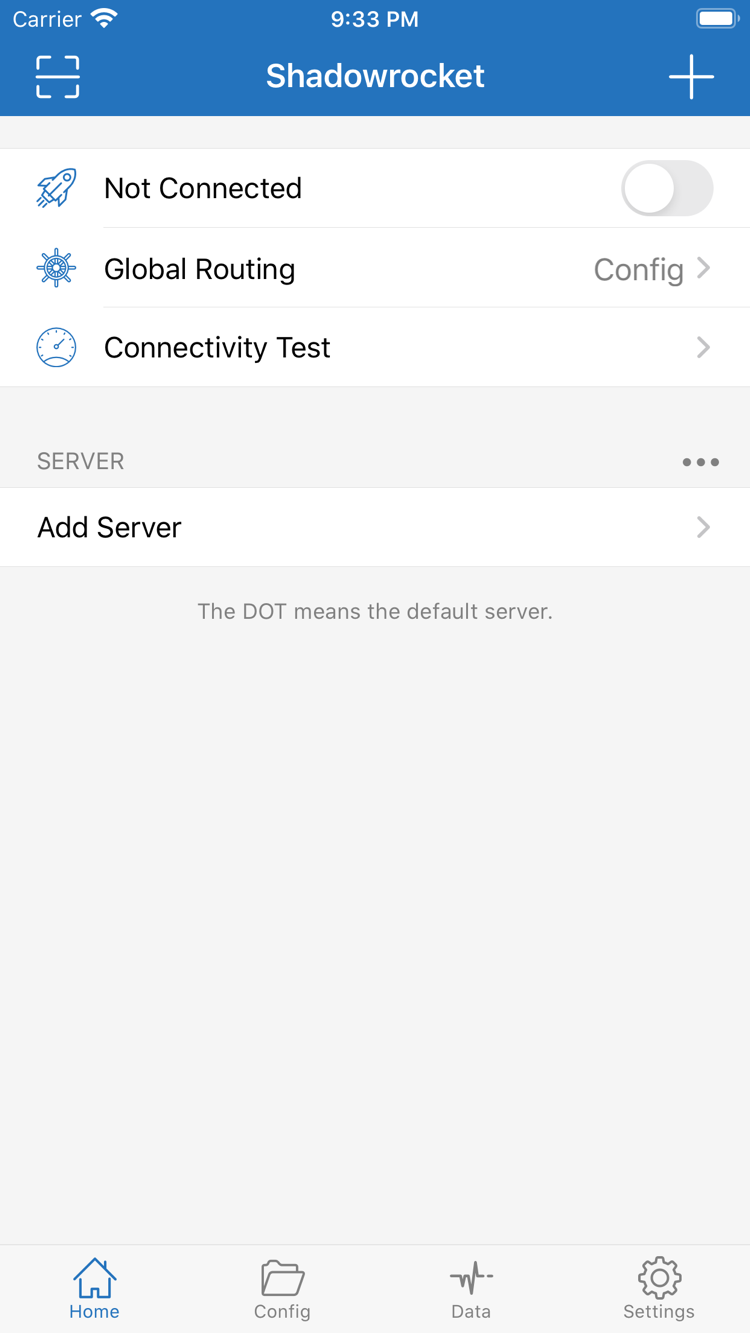
The Home screenshot may show Not Connected at the top, Global Routing set to Config, Connectivity Test, and SERVER with Add Server below. For a first setup, understand the order from bottom to top: prepare an entry through Add Server, select it in SERVER, confirm Global Routing, and then turn on the top switch. Users who have already imported their servers do not need to open Add Server every time. As long as the server details have not changed, daily use usually starts by selecting the entry and turning on the switch.

Shadowrocket Home screenshot showing Not Connected, Global Routing Config, Connectivity Test, SERVER, and Add Server
Home: select a SERVER entry, confirm Global Routing, and then use the top connection switch.

Use Connectivity Test to verify the connection

A changed top status only means that the system connection process has progressed. It is not enough to determine whether every destination is handled as expected. Keep the current SERVER and Global Routing unchanged, open Connectivity Test, and run a check. Do not switch networks, update the subscription, or edit Config during the test. Change only one condition at a time so the result can be associated with a specific setting.

After the check, distinguish among three situations: “the connection cannot be established,” “the connection works but access to a destination is abnormal,” and “only the latency is high.” With no response at all, first review the server parameters, current network, and system time. If the connection works but a specific destination is abnormal, check whether Config rules send it to the expected policy. If only the latency changes, do not immediately delete the configuration, because latency depends on network quality, the test method, and the server response state.

Compare Config and Proxy

If Config is active and the result is unexpected, record the behavior and temporarily switch to Proxy, then run the same check again. If Proxy works while Config behaves differently, focus on the configuration file, Rule order, and final policy. If neither mode can connect, check the SERVER entry and network conditions first. After testing, restore the Global Routing mode needed for daily use so that a troubleshooting mode is not left active.

Actual access can also provide supplementary verification, but choose a destination whose expected handling you understand. For example, if a DOMAIN-SUFFIX rule should use PROXY, check whether it matches the expected policy. If a local-network IP-CIDR should use DIRECT, confirm that local resources remain accessible. Do not judge rule correctness only by whether a page opens, because caching, existing connections, and redirects to different domains can affect what you observe.

Record a reproducible result

If further troubleshooting is needed, record at least four items: the selected SERVER, whether Global Routing is Config or Proxy, the network type, and the result category shown by Connectivity Test. Do not record or publish Password, keys, complete subscription URLs, or other sensitive content. Keeping these non-sensitive conditions prevents unnecessary changes during the next check and makes it easier to find the relevant section in Troubleshooting.

  1. Confirm the status: Home no longer shows Not Connected, and the current SERVER remains selected.
  2. Run the check: Complete one test in Connectivity Test without switching Global Routing midway.
  3. Compare modes: If necessary, test Config and Proxy separately to determine whether the issue is closer to the rules or the server parameters.
  4. Restore the setting: After testing, return to the required Config, Proxy, or Direct mode instead of leaving a temporary troubleshooting mode active.

Check common failure points in order

When a connection fails, start with the easiest status to verify and avoid changing several fields at once. First check whether Home has a selected SERVER, then whether Subscribe finished updating. Next review the manual parameters, check Global Routing, and only then open Settings for test and network options. This order separates “nothing selected,” “incomplete details,” “unexpected rules,” and “diagnostic setting differences.”

1. No SERVER selected, or the wrong entry selected

Listing servers in Home does not mean that one has been selected. Confirm that the target entry has a selection mark and that its label and source are as expected. If several entries with similar names appear after repeated imports, test the one whose parameters were most recently confirmed instead of deleting everything. If one entry connects under Proxy while another does not, compare their server details rather than attributing the difference to Config rules.

2. Subscribe did not finish updating

Open subscription management, confirm that the link is complete, and run the update again. If the update fails, first check whether the device’s current network works, then check whether copying removed characters from the URL or added spaces. After a successful update, return to Home and confirm that the entries in SERVER changed as expected. A successful update does not guarantee that every entry works; select a specific server and verify it through connection and testing.

3. Manual parameters do not match Type

Return to Add Server, confirm Type first, and then check Host, Port, Password, Method, and the additional fields shown for that protocol. Port must contain the complete number provided in the details. Method, transport, and security-related fields must retain their original values. VMess, VLESS, Trojan, WireGuard, Hysteria2, and Shadowsocks use different field structures, so the entry method for one protocol cannot be applied directly to another.

4. Global Routing does not match the intended mode

If rule-based routing is needed but Direct is selected, the result will not follow Config’s Rule. If a complex Config remains active while testing a server, a rule issue may be mistaken for a server issue. During troubleshooting, confirm the server connection under Proxy first, then return to Config and inspect the rules. If Config contains a FINAL rule, also confirm that its final policy matches the intended result.

5. System time and current network

If the device date, time, or time zone is significantly wrong, some authentication and secure connections may fail. Restore the system time to an accurate state and test again. Then compare with another network that you can use, waiting for the connection to stabilize before reopening Shadowrocket. Do not repeatedly tap the switch while changing networks. If the issue occurs on only one network, record that condition and check Diagnostics before rebuilding all server entries.

6. Review Settings and Diagnostics

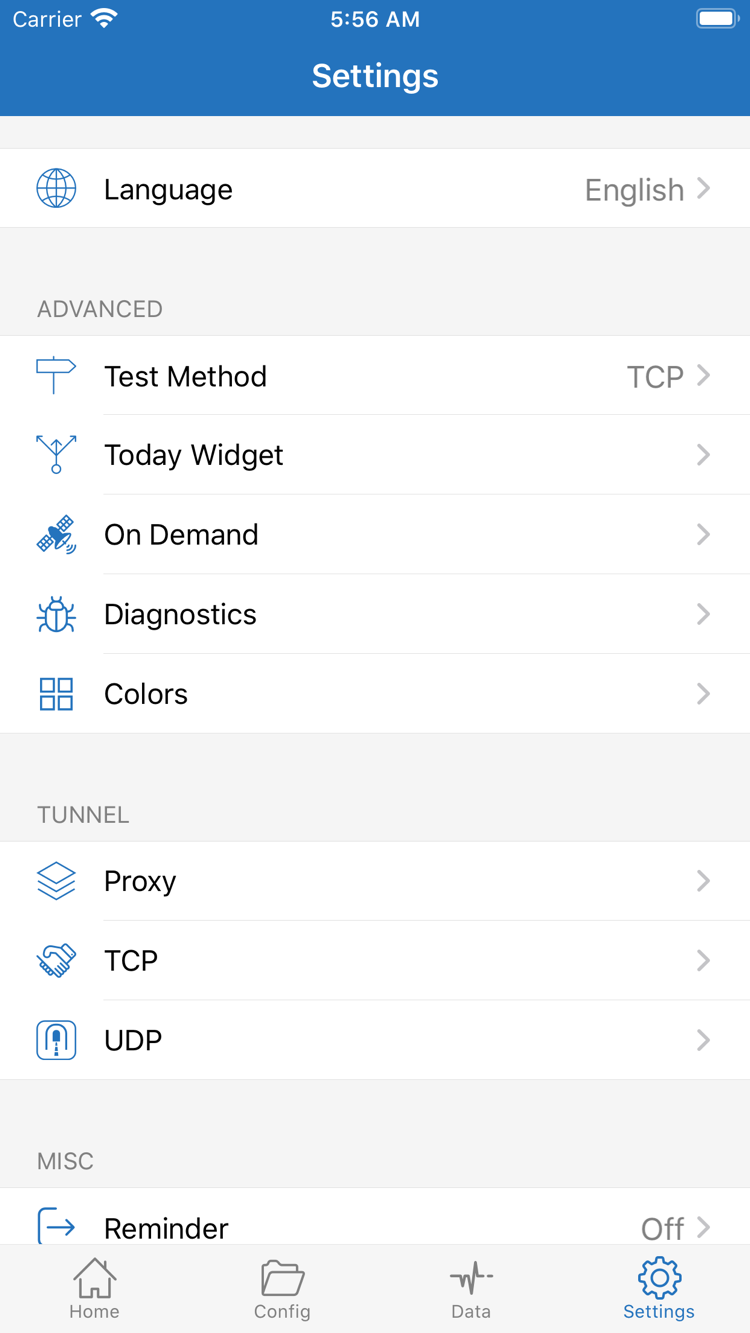
The Settings screen includes Language, Test Method, Today Widget, On Demand, Diagnostics, Proxy, TCP, and UDP. During initial troubleshooting, focus on Test Method and Diagnostics. Test Method affects how checks are performed, so results from different settings should not be compared directly. Diagnostics provides diagnostic information; avoid sending content that contains authentication details.

On Demand triggers connections according to conditions. If the connection opens or closes automatically on a particular network, check whether On Demand is enabled and review its conditions instead of only operating the Home switch. Proxy, TCP, and UDP also contain more detailed network options. Unless there is a specific issue and a clear parameter basis, avoid changing many of them during the first connection. After each change, run Connectivity Test again and record the result.

After completing these checks, return to Home and reconfirm SERVER, Global Routing, and the top status, then run Connectivity Test once more. If the result returns to normal, keep the working combination and stop changing unrelated items. If it still fails, use the recorded failure stage to focus on one category: subscription updating, server parameters, rule files, or the device network.

Shadowrocket Settings screenshot showing Language, Test Method, Today Widget, On Demand, Diagnostics, Proxy, TCP, and UDP
Settings: during troubleshooting, check Test Method, On Demand, and Diagnostics before detailed network options.

Daily operation after setup

For routine use, confirm SERVER and Global Routing in Home, turn on the connection, and run Connectivity Test when needed. For server updates, duplicate cleanup, and rule maintenance, continue with the Server Management Manual and Troubleshooting sections.

Download Shadowrocket